
Learning to read option risk graphs is important as it will help you visualize the possible outcomes of a strategy that you are contemplating, notes Russ Allen of Online Trading Academy.
In last week’s article, which you can read here, I discussed gamma and option payoff diagrams. I showed a price chart of GLD, and an option payoff diagram for a November 130/135 bear call spread, which are reproduced below. I left you with these cliff-hanging questions:
Do we want high gamma or low gamma? Positive or negative? Is it a good thing or bad? And how does the diagram show us any of that?
Glad you asked. As always—it depends on which side of the fence you’re on. Below are the diagrams, and then the explanation.
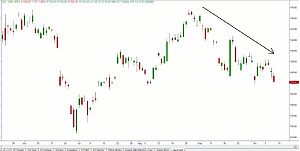
Figure 1 – GLD as of October 10, 2013
Click to Enlarge
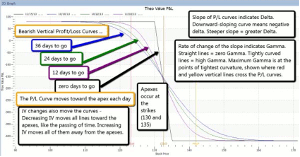
Figure 2 – GLD Bear Call Spread, with Selected Dates’ P/L Curves
Click to Enlarge
Now for the explanation.
Someone who buys an option wants its value to increase as much and as fast as possible. For option owners (whether they own puts or calls), high gamma means high leverage. If things (meaning the stock price) go their way, the payoff increases faster and faster; if the stock price goes the wrong way, they lose, but at a slower and slower rate. If an option buyer is very confident that the stock will move one way or the other, high gamma is just the ticket.
Option sellers, on the other hand, want the options they sold to melt away to zero. It follows that they want the deltas of those options to drop quickly too, since an option whose value is zero has zero delta as well.
These things are true about gamma:
A single long option position (put or call) always has positive gamma, and will have been entered for a debit (money paid out).
A single short option position (put or call) always has negative gamma, and will have been entered for a credit (money taken in).
Gamma is higher for options that have more time value. So it is highest for at-the-money options, and less for both In-the-money and out-of-the-money options.
If the position involves more than one option (like our bear call spread), then the total position gamma will be the net of the positive and negative gamma values of all of the options in the position. The same is true of all the other Greeks. We sum up the deltas of all the individual long and short options in the position to find the position’s net delta, and the same with theta and vega.
Any position will have been entered for a net credit or debit, depending on whether we bought the more expensive options and sold the cheaper ones, or vice versa. In this case, we sold the more expensive 130 calls, and bought the cheaper 135 calls, so we got a credit ($80.50).
Any position with positive gamma is hurt by time decay; one with negative gamma is helped by time decay. Positive gamma positions always have negative theta.
Any position with positive gamma is helped by an increase in implied volatility; one with negative gamma is hurt by it. Positive gamma positions always have positive vega.
Positive gamma means that the position requires underlying price movement in order to profit. A positive gamma position must be sold for more than its cost in order to realize the profit.
Negative gamma means that the position can profit with no underlying price movement. A position with negative gamma is designed to profit from time decay, or a drop in implied volatility, or both. It will not necessarily need to be liquidated to realize its profit, since credit was originally received when the position was entered. If the options involved expire with no value, then no action needs to be taken.
NEXT PAGE: Gain an Edge with an Edge
|pagebreak|For positions with positive gamma, the higher the gamma, the greater the leverage of the position. High gamma means rapid change in option value when the underlying moves (which can be favorable or unfavorable depending on the direction of the move)
Finally, in terms of how gamma is portrayed in an option payoff graph, look again Figure 2 above, and note the comments in the black box. The degree of gamma is shown by the curvature of a P/L line. Tight curves mean high gamma, while straight lines (whether horizontal or diagonal) mean zero gamma.
Negative gamma is shown by a P/L line that curves downward, forming part of a dome shape. In our example, this is true from the point where the blue curve breaks down below the horizontal at around GLD $110, rightward and downward to the point where the blue curve crosses the straight black line, at around GLD $132.50. In this range of GLD prices, our positive gamma from the 135 call that we are long, will be less than our negative gamma from the 130 call that we are short, so that we will have a net negative gamma. That means that in that range of GLD prices, we benefit from time decay (we have positive theta) and are hurt by any increase in implied volatility (negative vega).
At that $132.50 crossover, the blue P/L curve stops curving downward and briefly becomes a straight diagonal line. Although the line has slope (delta) at that point, it has no curvature, so the gamma of the position is zero. This is because at that price, our positive gamma from the 135 call that we are long, would be exactly equal to our negative gamma from the 130 call that we are short, so that we would have a net gamma of zero.
At that exact crossover price, since the two lines cross and have the same value, there is no difference between the value of the straight “at expiration” P/L line and the value of the blue “today’s P/L” curve. That means that the net time value of our position is zero. We are neither long nor short time value in total, because the long time value contained in our long 135 call is exactly canceled out by the short time value in our short 130 call. With no net time value at that point, our position vega and theta are also zero, since they only affect time value.
So at the $132.50 crossover point, with gamma, theta, and vega all zero, the only Greek with any effect is delta. Only a change in the price of GLD will get things moving again.
Positive gamma is shown by lines that curve upward. In any range of underlying prices where the P/L curve forms part of a bowl shape, gamma is positive. In our example, this is true from the crossover point at GLD $132.50, rightward and downward to the point where the blue curve again goes horizontal and merges with the black straight line, around where GLD = $160. At these higher GLD prices, our positive gamma from the 135 call that we are long, will be greater than our negative gamma from the 130 call that we are short, so that we will have a net positive gamma.
Positive gamma always goes with a position that is net long time value; and any position that is long time value is helped by increasing IV (positive vega) and hurt by time decay (negative theta).
With practice, reading the option payoff diagram is quick, visual, and (eventually) intuitive. It lets us see clearly at what underlying prices our position would be profitable; and how it will be affected by any changes in underlying price, volatility, or time decay. When we combine this information with our expectations for underlying price and volatility, we gain “an edge with an edge” in our option trading.
By Russ Allen, Instructor, Online Trading Academy